Showing posts with label recycled. Show all posts

Wednesday, December 9, 2009

Christmas Jar Labels

I love to re-use the little plastic clear jars. They are very handy to store all kinds of items in and especially good for seasonal candies!
I made these labels and jar lid covers to match and uploaded a copy of all three different labels in a zip file. They fit these 18 oz peanut butter jars, and may fit other similar jars.
Download the zip file here if you would like a copy of the labels.

Graphics by Graphic Depot.


Sunday, October 11, 2009

More Pop Top Tab Bracelets

Yesterday I made bracelets with my 15 year old Grand Daughter. She loves these bracelets so I was thinking that maybe we could try putting some beads on one. I have a variety of colors in the pony beads which I thought would work with the larger holes that they have. Purple is one of her favorite colors so this is what we made.
To make these bracelets with the beads, simply follow the instructions given in the links of my previous post.
http://craftythisandthat.blogspot.com/2009/07/another-pop-tab-bracelet.html
The only change in the instructions would be to add the bead as in the third photo below. Easy!!
We were also thinking that different colors of elastic cording would be pretty to use on these....but where can we find the colored elastic cording? I really would love to find it in black and colors.
Anyone know?


Friday, July 24, 2009

Making a Birdie Toy

It has been a while since I actually put together a craft, so I decided to get back to crafting. I've been thinking about making a toy for my little pet parakeets. Since I posted about Sunny and Sugar, my Lutino and Albino, I have gained another parakeet to keep them company. I purchased a very young one, and I named it Sassy.
Since I have the three birds, I've been hanging out at the Talk Budgies forum to learn more about my keets. They have some very knowledgeable members there and I've found out many things I didn't know about my babies.
The main thing I learned is that my Sunny and Sugar are likely females and Sassy is a young male. Just the opposite from what I have been thinking lately. I guess only time will tell. Maybe I will know for sure if two of them decide to mate or one decides to lay an egg.

I saw a bird toy at a pet store that was made of craft sticks of different colors and beads. I was thinking why would I buy that when I have everything to make it at home in my craft room.
That was about a week ago. Today, I decided to give it a go.

EDIT: 7/25/09
For anyone thinking of making this toy for your pet, I feel I need to point out safety..... always put the safety of your pet first!
1. If you are in any doubt about any product for you pet, do not use it!!
2. Always use common sense and never, ever, let your pets have any toy that might be a safety hazard such as possible tangling, choking, or anything that might be toxic or may cause other bodily harm. Make sure if you tie knots, that your knots are very secure. Keep an eye on your pet's toys. If the toy becomes damaged to the point of being a hazard, remove the toy and discard it.
3. While I do not believe the US FDA approved food coloring is harmful as a toy coloring, if you have any doubts about using food coloring in the US or your country, do not use it. This same toy can be made from uncolored wood sticks. I do not have a source for uncolored wood beads but I am sure they are out there, probably in craft stores.
As I said previously, use a lot of common sense!

(The photos are clickable to enlarge.)

This is what I made and it took less than an hour of actual hands on time. It is very easy to make and all of the supplies can be found easily in most any craft department.


I used Popsicle sticks (I saved from real Popsicles to recycle), washed and rinsed. I boiled the sticks and added some food coloring to the water. I only used a cup or two of water and part of a bottle of blue and also mixed in about half a bottle of green food coloring. Since this was a try as you go and see how it turns out, I did not measure. I just guessed as I went along. After letting the sticks soak up the dye and stirring them around quite a bit, for about 5 minutes or so, I took them out into the sink. I rinsed them several times with cold water until the water was clear. I then put them on a couple layers of paper towels and patted the excess water from them. They did still stain the towels a bit but after placing them on clean paper towels and letting them dry overnight, there was no stain from handling them.

Today, I gathered my supplies:
A plastic ring to attach to the top.
Jute Twine - about 24 inches for this one.


My collection of Pony Beads - any color and number, depending on the length of the toy.


Crop-A-Dile Eyelet & Snap Punch - to punch the holes through the craft sticks. This is one of my favorite toys. A drill with a small drill bit, could be used instead.


I used 12 sticks - dyed and punched.


Making the toy was really easy. First I wrapped one end of the jute twine with clear tape to make it slide through the sticks and beads easily. This is what it looks like. After finishing, this tape can either be pulled off or cut off.


I tied a double knot near the other end leaving a short "tail". Added a small bead, one that will not slip over the knot, then tied again above that bead and added a larger bead that I think will catch my bird's eye. This is the bottom of the toy, I worked from bottom to the top.


I alternated a bead and a craft stick until I used up the sticks, then added a few more beads at the top for detail. I tied a plastic ring to the top (recycled from a package of blank CD's). After taking this photo, I found a clip and attached the ring to the top of my birdie cage.


The birdies can chew on the sticks, swing it around and just have fun with it. Before long they will probably be climbing it.
My trio are looking it over really good now as I have just hung it in their house. I think they are trying to decide which bead is the prettiest or which stick they will chew first.

Friday, July 3, 2009

Another Pop Top Tab Bracelet

I made this bracelet from a tutorial that I watched on a YouTube Video. You can watch it HERE.
I also found the written instructions with photos HERE on this page of the wonderful Creative Origins blog.
I found these instructions to be very easy to understand.
Thank you Creative Origins for these easy instructions!
I used silver colored wrapped elastic cording and it looks nice with the tabs. I pulled the elastic so that I didn't leave any slack between the links. When I finished and tied it all together, there is just enough stretch so that the bracelet slides over my hand. I used 26 tabs and the bracelet is 8 inches.

Click on photos for a larger view.


Tuesday, June 30, 2009

Pop Top Tab Jewelry

Thank you for all the comments and suggestion on the pop top tabs! I decided to try my hand at a little jewelry. The below photos are the result of my first try. With a little practice they can be made very quickly. These pieces took me about two hours to make. The bracelet contains tabs back to back so there is no rough side touching the wrist. I used a total of 18 tabs for the bracelet. It is 8 inches long.
I will definitely be playing around with more of these tabs and I do have a plan for donation of any that I may not use. Thank you again for all the suggestions.

Click on photos to enlarge the view.


Sunday, June 28, 2009

Pop Top Tabs

You probably have read or thought about all the germs and dirty things that might be on the soft drink tops. I always make an effort to really clean the top before drinking, or pouring the drink, from the can.
I also have a habit of bending that little tab back and forth 3 or 4 times and it will pop right off. I keep a little container close by and just drop it in. One, after one, I've been saving these little tabs for months.
How many soft drink tabs does it take to fill this quart size jar? I have no idea. I haven't counted them! I just like to save little things that I think can be recycled. Maybe I can think of a way recycle these tabs into something useful or something cute. If not, they will go to the county recycling center. Right now, I am thinking I will try to make something from these little tabs and post it later, so stay tuned.


....more tabs that I've thrown into this bowl one, by one. Most are soda (soft drink) can tabs and a few pop top tabs from miscellaneous type cans.

Tuesday, June 23, 2009

CD Photo Album

I've been wanting to make one of these albums for a long time. I don't know why it took me so long because they are so easy and fun to do!
First I prepared my cd's by scuffing them up a bit with sandpaper and/or a metal file.
The shiny side of the cd has a raised ridge about a half inch out from the center opening so I used the metal file from my tool box to file that down. You can easily tell when it it smooth by running your finger across the surface of the cd. I wanted this smooth because I planned on covering both sides.
After scuffing the cd's, I opened my pictures in my digital image editing program and started with a 4.75 inch circle. I then added and cropped my photos and added text until I got the look that I liked. With these photos I chose words that I think are suitable for the three young family members in the photos. I think they were just playing with the camera and having fun taking these photos.
Next, I printed out my circles on card stock, laminated the front side only, sprayed adhesive on the backs and stuck them to the cd's.
Next I measured and cut out circles from scrap paper that was suitable for writing on for the back sides of each photo cd. I did not laminate the scrap paper because they will be used for personal journaling.
I also used the spray adhesive for these.
The last step was to punch the holes with my crop-a-dile and add a 1 inch notebook binder ring and embellishments.


Wednesday, June 17, 2009

Another Altered Vinyl Record

This is a 45 RPM record. I got the idea of making this with the owl saying from browsing the internet several days ago. I can't remember where I saw it but I decided to make my own graphics in my Digital Image program. It took me awhile to give it this look since I am not a graphic artist! As far as I know, there is not a copyright on the saying as it is a very old saying and I found several versions of it with a word or two changed here and there.
I printed this on white cardstock, laminated it, sprayed adhesive on the back and stuck it to one side of the old 45 record. I also used the Crop-a-dile to punch a hole and an eyelet for hanging it.

Front view of the 45 record.

Back side of the 45 record.


After making this one, I decided to add some shadows to the graphics and I think they look even better.
I'm giving away a copy this the cover for free download if anyone would like to have it. Please use it for "Personal Use Only". Do not claim this graphic as your own or use it in any way to make a profit.

My download includes 2 sizes. I made one for a 45 record and one for a CD. Download here.

Saturday, February 7, 2009

Altered Keys!

I have many old house keys, padlock keys, automobile keys and other types of keys that I have thrown in a box and saved over the years.

I decided it was time I did something with some of them so I found an idea from another website to alter some of them.

I've been working on these keys for a couple of weeks, just doing a little here and there. I finally finished these twenty using mainly what I already had in my craft stash to embellish them.

I've never done any real beading so this took quite an effort on my part. I'll have to say that beading is not my favorite craft. I may, however tackle some more at another time.

Here is where I found this idea.

Click on each of the images for a larger view:


Monday, October 13, 2008

Floppy Disk Post-It Note Holder

I saw one of these one day when I was looking through some craft sites.  I can't remember where I saw this idea but I thought it was cute and a good way to recycle some of the floppy disks I have and no longer use. I decided to make one and it was so easy!
I removed the old label and applied a graphic where the label was on the two disks. I attached the two disks together using ribbon.  You can use your imagination and use different methods to attach them together.  The holes are already there so this was easy.  Add any kind of embellishment or trim that you like and stick a post-it note pad inside.  That's all there is to it and it cute and different.
I think one of these would be good to hang by your front door, along with a pen or pencil,  with the outside graphic saying "leave a note".

Front, Back and Inside view:


Friday, August 1, 2008

More Altered Tobacco Tins

I think this is an easy and quick way to turn an ordinary tin into something pretty instead of it ending up in the garbage and then in landfields.

The first tobacco tin that I altered and, and also the original tin before I altered it be seen on a previous post at the following link.
http://craftythisandthat.blogspot.com/search/label/Altered%20Tobacco%20Tin
The directions are also on that page.


I lined the inside bottom and lid with stick on black felt


This is a view of the inside lid - a close up of the felt lining .

Thursday, July 10, 2008

Christmas In July

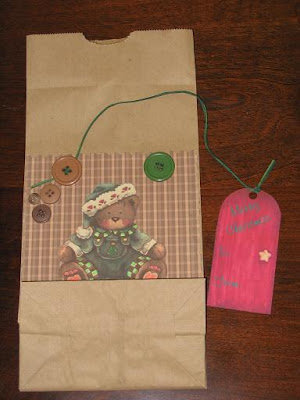
Make a Christmas gift bag from a plain brown bag. You can decorate the bag anyway you want. Glue on, paint on, or tie on what ever you have on hand to give your bag a Christmas look. This is a quick and easy idea to use if you need to give a gift and don't have wrapping paper or purchased gift bags on hand.
Don't stop at Christmas gifts, you can also use this idea for other gift occasions.
You can buy a package of fifty of these little brown bags in the supermarket food wrap section for less than two dollars or at one of the Dollar Stores for one dollar. You can also re-use some of those little white "pharmacy" bags. Recycling paper is always good. Regardless of the occasion, you can make a bag for that little gift. Bear graphics are from pcCrafters
©JP2008


Tuesday, June 24, 2008

Altered Tin

Who would have thought this tobacco tin could be so pretty. This is one of the few brands that have a metal can. Most are plastic. It has a plastic liner around the bottom inside edge, but the remainder of the can is metal.
Of course I don't chew or dip or whatever you call it! I personally think it is a bad, nasty addiction. I know someone who does use this, and that is where my tin came from.
Below are the steps to show how I altered this tin.

Be sure to click on the photos for a closer view.

The first two photos show what the can looked like before it was altered.


To start altering it, I added a big "glob" of glitter glue to the top. I used the inexpensive kind you find around Christmas at the Dollar Tree or the 99 cent stores.
You can find it almost anywhere you buy craft supplies.


I applied a generous amount of glue to work with.


Then I picked out a few pretty elements from my button and bead collection and placed them around on the glitter glue. I used the very small pearls and seed beads to fill in.


After the glue dried for a day or so I brushed on gold leaf paint around the edges. This step can be done before the glue and elements are added to the top.
Either way works fine.


The edges could be further embellished with trim of my choice but I prefer my tin without more trim. This is my finished tin and it was so quick and easy!