Wednesday, December 31, 2008

Adding color to a black and white photo

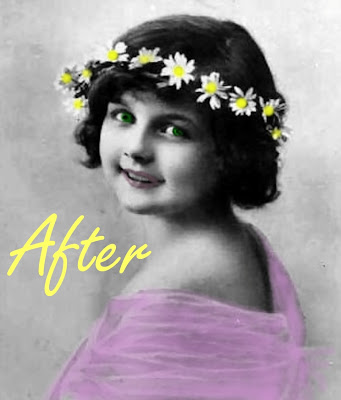
This is the "before" and "after" copy of a vintage photo that I colored (or tinted).

Many of you probably know how to do this and may do it in a different way, but I wanted to share how I did this photo.

I use Microsoft's Digital Image 2006 photo editing software, but I'm sure with a few tweaks this could be done in similar steps with the other digital imaging programs.

If you click on each picture, it will give you an enlarged version.


copyright free photo

Before you work on any section, always click on the part that you will be working on which will give it the blue highlight color. You will see the highlighted part in the stack, right column. It will look like it has a blue shadow over it. If you start to color in a section with the transparency brush and it does not do anything, go back and make sure you have the photo or section that you will be working on highlighted.

The first step is to open your graphic in your editing program and duplicate
your image then close it out. Use the duplicate photo to edit.
Click on the Insert button and choose shape then choose the square.


Next use the mouse to pull and resize the square into a rectangle shape and tilt it into the position of what you want to color. In this example it will be
the centers of the daisies that will be colored yellow.
Next, with the rectangle highlighted, click on the Effects button then choose Fill with Effects or Color.


Next, choose the color to fill the shape.


After you have your color, click done and it will take you back to the work area.
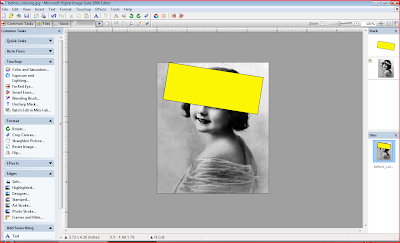


Then, go to the yellow shape in the stack and hold down the left mouse
button on it and drag it below the photo in the stack. This will move the
yellow shape behind the photo.


The yellow shape is now behind the photo.
The next step is to highlight the photo that you will be working
on in the stack.


Then click on the Effects button again but this time choose
Transparency then choose Transparency Brush.

Here you will choose your brush size and the amount of transparency you need.

Your mouse pointer will turn into a round tip brush, so adjust the brush by changing the numbers up or down.
Use it to click away the parts of the photo you want the yellow color to show through.


Continue on until you have colored in all the yellow in the flowers.


After you have finished with this first step, go back to the work tray and do the same with the other sections of the photo that you would like to color.
Do each section in the same manner in which I colored in the yellow in the flowers. Add a shape and fill it in with the color you choose, slide it behind the photo, with it in the correct position and then go to the transparency brush.
These little step by step actions will give you a beautiful colored effect!

Below is a screen shot of all the steps I took in coloring in this photo. I added a yellow color for the flowers, a green color for the eyes, pink for the lips and a lavender color for the gown.


Isn't she pretty?
Saturday, December 20, 2008

Free Printable Calendars

I have some more calendars that I've been working on for a few days and finally I believe they are all finished and ready to share. I saw some similar to these on another blog and decided I liked her idea of making 5x7's to fit in an acrylic frame. However I wanted to make them a little different so here is my version and thanks to Lori at Free Digital Templates for her idea.

These are made at 300 pixels per inch and will look much bigger than the actual size of 5x7 inches. However they will print out at 5x7 inches as they are. Set your printer to print actual size.

Click HERE to download the JPG version of Soft Colors. Add your own photos.

Click HERE to download the PNG version of Soft Colors. Add your own photos.


Click HERE to download the transparent version. Add your own complete background and or photos.

Sunday, December 14, 2008

2009 Calendar Gift

A little Christmas gift for you. I hope you can use it. Graphics are from Trina Clark's website www.digiscrapkits.com ($2.00 sale going on there now)

Click on calendar to go to the full size and then right click and save to your computer.
6x6 inch at 100% (makes a cute magnet calendar printed on magnet sheet and laminated)

Crochet Wreath Pins

Years ago, I learned to crochet a little but i have not done any crochet in a long time now. I ran across these little pins that were stored away in with my Christmas things and I thought I would share them. I made several of these and handed them out to family members. I just added a safety pin to the back and we all wore them as pins. They are about 3 inches in diameter. I also used some for tree ornaments. I just added an ornament hanger and hung them on the tree. You could embellish this in other way such as run a narrow ribbon through it, add jingle bell or a little holly sprig or even a tiny poinsettia.
I no longer have the instructions but I googled and came up with several on line patterns.
Here is one I found that is very similar and has a free PFD download.http://www.y2knit.net/
Find the Free Patterns in the list of links, left side column.Then in the monthly archives, this pattern or one very similar will be listed in December 2005.


Monday, December 8, 2008

More Ginger Girl Recipes

This is the second part of the Ginger Girl Recipe Cards. This part also has 9 recipe cards and another blank card. The muffin recipes are included in this set.
The download link is HERE.

Sunday, December 7, 2008

Ginger Girl Recipe Cards with Recipes

I thought I would share some of the recipe cards I made from my Ginger Girl graphic. The first part will have 9 recipes on cards plus a blank card. It will be handy to add your own recipes to it! The muffin recipes are included in the set.
These cards look very large because they are at 300% but will print out a normal size at 4x6 inches.
HERE is the link to download the first part of the set.